Cool Knitting Patterns I Have Found

Friday, December 02, 2005

elegant scarf

Materials: 3oz of a pearl cotton or lightweight rayon; Size E crochet hook.

Gauge: Approx. 3 ch-5 spaces (in height and width) to 2" worked on size E hook

Scarf: Foundation row Ch 9, 1 sc in 9th ch from hook, turn.

1st row Ch 9, 1 sc in 3rd of 9 ch, ch 5, 1 tr in ch-9 loop, turn.

2nd row Ch 9, 1 sc in 3rd of 5 ch, ch 5, 1 sc in 3rd of 9 ch, ch 5, 1 tr in ch-9 loop, turn.

3rd row Ch 9, (1 sc in 3rd of next 5 ch, ch 5) twice, 1 sc in 3rd of 9 ch, ch 5, 1 tr in ch-9 loop, turn.

4th row Ch 9, (l sc in 3rd of next 5 ch, ch 5) 3 times, 1 sc in 3rd of 9 ch, ch 5, 1 tr in ch-9 loop, turn.

Cont. in this way, working one extra ch-5 loop on each row, until 48 rows have been worked or scarf is required size. Do not fasten off.

Edging: * Ch 18, skip 5 ch, sl st in 6th ch, in ring just formed work 12 sc, sl st in first sc to join the round, ch 4, skip 4 of the remaining 12 ch, 1 sc in next ch, ch 7, 1 sc in next ch-5 loop of 48th row. Repeat from * to the end of the row, then continue along the side of the scarf, working 2 ring tassels in each corner loop, and working in alternate loops only on the side edges of the scarf.

monet afhan

Monet Afghan


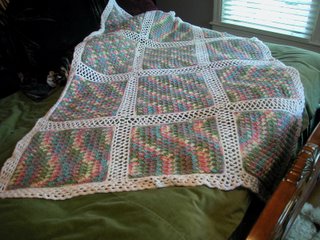
I called this afghan “Monet” because the colors look like an impressionist painting. I suggest making this afghan in any color, either solid or variegated, because the texture of the stitches make it special. The finished afghan measures approximately 46”X66”.


Monet Afghan
©2005 Drew Emborsky, aka The Crochet Dude

Each square measures 13” x 13”

Make 12:

Materials: Worsted Weight yarn – Size H crochet hook

Row 1: Ch 47, sc in second ch from hook and in each ch across. (46 sc)

Row 2: Ch 1, (sc, 2 dc) in first st, *skip 2 sc, (sc, 2 dc) in next st * across. Sc in last st.

Row 3-33: Ch 1, (sc, 2 dc) in each single crochet across.

Row 34, sc in each st across. Do not fasten off. Sc evenly around square working 3 sc in each corner. Fasten off.

Join squares together using a simplified Lattice Technique (origin unknown) as follows:

Rnd 1: With contrasting color join with a sc in any corner, work 2 more sc in same st, work 47 sc on each side and work 3 sc in each corner. Join with a slip st.

Rnd 2: Slip st into corner st. Ch1, (sc, ch 4, sc) in same st. (Ch 3, skip 2 sc, sc in next st) around, working (sc, ch 4, sc) in each corner st. Slip st to first sc, fasten off.

Lay the squares out in a 3 by 4 pattern. First join squares together to make three long strips with four squares each. Then join the three strips together to create ghan. Join by making a sc in corner loop, ch 3, sc in corresponding loop on opposite square. Ch 3, sc in next loop of first square, ch 3, sc in corresponding loop of opposite square, and so on back and forth.

Once joined, edge entire afghan by working three rounds of (sc, ch 3) in each loop.

winter hood

Free Crochet Pattern - Winter Hood

This unique and snuggly winter hood crochet pattern was Kindly Contributed by Designer: Willow Eicher of Willow's Crochet and Craft Store. For more designs by Willow click here and visit her pattern gallery.

Pattern Copyright © 2001 Willow Eicher. All Rights Reserved

Materials: 8 oz. Worsted Weight Yarn--I used Red Heart Super Saver in Teal; Susan Bates I hook

Finished Size: Front--15"; Back--18"; Circumference--39"

Pattern Notes: Abbreviations and Charts

Beg: begin(ing); Ch(s): chain(s); Cl: cluster(s); Dc: double crochet; Jn: join; Lp(s): loop(s); Patt: pattern; Prev: previous; Rem: remaining; Rep: repeat; Sc: single crochet; Sk: skip; Sl: slip; St: stitch; Sl st: slip stitch; Sp: space

Pattern stitches:

Shell Stitch: (3dc, ch 2, 3dc) in indicated stitch or space

V-Stitch: (dc, ch1, dc) in indicated stitch or space

Instructions: Foundation ch--ch 131 or 39" in multiples of 10 + 1

Row 1: sc in second ch from hook and each ch across (130 sc).

Row 2: ch 4; dc in 1sr sc; sk next 4 sc; (3 dc, ch 2, 3 dc) in next sc; *sk next 4 sc; (dc, ch 2, dc) in next sc; sk next 4 sc; work shell in next sc; rep from * across to last 5 sc; sk next 4 sc; (dc, ch 1, dc) in last sc.

Row 3: ch 3, turn; 3 dc in 1st dc; *in the ch 2 sp of next shell, work v-stitch; in ch 2 sp of next v-stitch, work shell; rep from * across to turning ch from prev row; work (3 dc, ch 1, dc) in turning ch.

Row 4: ch 3, turn; dc in 1st ch 1 sp; *work shell in ch 2 sp of next v-stitch; work v-stitch in ch 2 sp of next shell; rep from * across to turning ch from prev row; work (dc, ch 1, dc) in turning ch.

Rows 5-25: rep rows 3 and 4; finish off after row 25.

Holding right and left ends together and working through both layers, 3 sc in the open space at the end of rows (turning chain areas). Turn hood right side out so that the seam is now inside the hood.

Row 26: starting in the 4th shell stitch of row 25, join yarn with a slip stitch; ch 3, dc in same st; *work shell in next v-stitch; work v-stitch in next shell; rep from *3x; work shell in next v-stitch; (dc, ch 1, dc) in next shell.

Row 27: ch 3, turn; work 3 dc in 1st ch 1 space; *work v-stitch in next shell; work shell in next v-stitch; rep from *3x; work v-stitch in next shell; work (3 dc, ch 1, dc) in turning ch.

Row 28: ch 3, turn; dc in 1st ch 1 sp; *work shell in next v-stitch; work v-stitch in next shell; rep from *3x; work shell in next v-stitch; (dc, ch 1, dc) in turning ch from prev row.

Row 29: Rep row 27. Finish off after row 29. Weave in ends.

Note: This pattern is for your own personal use only. Please do not reproduce this pattern in any form without the designer's express, written permission. Every effort has been made to provide accurate and complete instructions. I cannot be responsible for your personal stitch variances, human errors, or typographical mistakes.
happy hearts purse

Crochet Patterns - Happy Hearts Purse

This darling heart purse crochet pattern was Kindly Contributed by Designer: Marlo Cairns of Marlo's Crochet Corner. For more unique patterns like this, click here and visit Marlo's design gallery.

Copyright © 2001 Marlo D. Cairns. All Rights Reserved

Materials Needed: About 2 ounces of worsted weight acrylic yarn, small amount of a contrasting color for heart motif ,size G hook.

Instructions: Chain 30

Row 1- in 2nd ch from hook hdc and in each remaining ch, turn.

Row 2-37: ch2, hdc in each st, turn.

Fold piece just made in half and sc through both thickness to seam the side finish off and do the same on the other side finish off.

Straps - Make 2: ch 50

Row 1 - in 2nd ch from hook hdc the length of chain turn.

Row 2 ch 2, hdc in each st do not finish off.

To attach the handles count over 4-5 stitches from the side of the top of the bag and sc the strap to the purse I did 2 sc in first st , 1sc in next st, and 2 in the last st finish of and do the same to the other side.

Heart Motif: ch 2

Row 1- sc in 2nd ch from hook ch 1 turn

Row 2 - 3 sc in sc, ch 1 turn

Row 3 - 2 sc in each sc, ch 1 turn

Row 4 - sc in each sc across, ch 1 turn

Row 5 - 2sc in first st, 1sc in next st, 2sc in next st, 1 sc in next 2 st, 2 sc in next st , ch 1 turn, 9sc total

Row 6-8 sc in next 4 st ch 1 turn

Row 9 - sc in next 2 st together 2 times ch 1 turn

Row 10 - sc in next 2 st together and finish off

Attach yarn into first stitch of the missed 5 stitches and do the same as rows 6-10, Note: one stitch in the middle will not be worked at all, do not fasten off

Continuing around the outside edge of the heart sc evenly around including the missed stitch (sc 2 times in missed stitch and sc 3 times around point at bottom) and finish off.

I made these purses for my 2 sweet girls on my recent trip to Las Vegas. I put all of their goodies in them that I bought. These are very easy to make and just the perfect size for a child. ENJOY!! Marlo

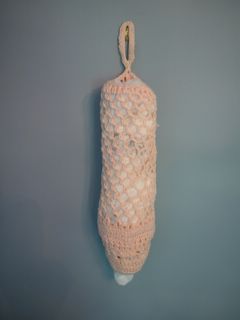
grocery bag dispenser

Grocery Bag Dispenser


Grocery Bag Dispenser

© 2005 Drew Emborsky, The Crochet Dude

Materials: Worsted Weight Cotton
Crochet Hook, Size H (5.00mm)
Two 5” elastic ponytail bands


Rnd 1: Join to stretchy thingie with a slip st. Ch 3, 29 dc around ring. Slip st to top of beginning ch 3.

Rnd 2 & 3: Ch 3 dc in backloop of each st around. Slip st to top of beginning ch 3.

Rnd 4: Ch 1, sc in same st, ch 3, *skip one st, sc in next st, ch 3 * around. Slip st to beginning ch 1.

Rnd 5: Ch 2, dc in next ch 3 loop, dc in previous ch 3 loop. *dc in next unworked loop, dc in previous loop * around. Slip st to beginning dc.

Rnd 6: Ch 1, sc in same st, ch 2,* sc in next st, ch 2 * around. Slip st to beginning sc.

Rnd 7: Ch 2, dc in next ch 2 loop, dc in previous ch 2 loop. *dc in next unworked loop, dc in previous loop * around. Slip st to beginning dc.

Rnd 8: Ch 1, sc in same st and in each st around. Slip st to beginning sc.

Rnd 9: Ch 3, working in backloops only, dc in each st around. Slip st to top of beginning ch 3.

Rnd 10: Ch 1, sc in same st. Ch 2, * skip one st, sc in next st, ch 2 * around. Slip st to beginning sc.

Rnds11: Slip st into loop. Ch 1, sc in same loop. Ch 3, * skip one loop, sc in next loop, ch 3 * around. Create final loop of rnd with ch 1, sc in beginning sc.

Rnds 12-27: Ch 1, sc in same loop. Ch 3, * sc in next loop, ch 3 * around. Create final loop of rnd with ch 1, sc in beginning sc.

Rnd 28: Ch 3, dc in each loop and each st around. Slip st to top of beginning ch 3.

Rnd 29: Slip st in each st around. Do not Fasten off.

Ring for Hanging. Work 44 sc around the second elastic band. Slip st to next st on Rnd 29. Fasten off.

paris loop

Paris Loop, by Stefanie Japel.

This design commemorates the trip I recently took to this beautiful city with my husband, my mother and my sister. There are no shaping techniques required, just pure and simple knitting and purling. If you are already a circular pro, this can be knit while watching videos! The shaping is achieved by changing needle size. The gauge decreases as the piece is worked from the hemline to the neckline. This decrease in gauge creates an A-line shape, and adds stability to the neckline so it does not constantly require adjusting while being worn. The needle sizes listed below are the ones used for the original. Because the yarn is so lofty and stretchy, and because the exact circumference of this piece isn't crucial, the needle sizes can vary according to what you have on hand. The length of the circulars can vary, too.

Stefanie's website.

DIFFICULTY LEVEL
Simple

SIZE
One size. Seriously. Fits All.

MATERIALS
Needles:
One 16-inch US 17 circular needle
One 16-inch US 13 circular needle
One 16-inch US 9 circular needle

Yarn: Gedifra Cicco [110 m. per 50g ball.]; colour: ??, 4 balls

GAUGE
Section 1: 12 sts and 20 rows over 4 cm
Section 2: 14 sts and 24 rows over 4 cm
Section 3: 16 sts and 28 rows over 4 cm

PATTERN

With largest needle, CO 110 stitches and join. P 5 in. Change to medium needle. K 7 in. P for 7 in. Change to smallest needle and K 5in.
BO using medium needle to ensure neckline bound off sts aren't too tight (and the neckband too stiff).

FINISHING

Weave in ends. Ooh La La!

boob tube

SIZE

One size (really) fits all

FINISHED MEASUREMENTS
Chest: up to 54 inches (140 cm)
Length: 14 inches

MATERIALS

[MC] Noro Big Bebe [38% cotton, 29% ramie, 39% wool, and 4% nylon; 28yd per 50g skein];
color: Number 7; 5 skeins
[CC] about 25 yards of leftover cotton yarn

1 24-inch US #17/Xmm circular needle

1 24-inch US #8/5mm circular needle

notions required: darning needle for weaving in ends.

Up Close

GAUGE

6 sts/8 rows = 4" in stockinette stitch

PATTERN

Cast on 55 stitches and join.

Knit tube to 14 inches, or do desired length.

Purl one row.

Knit one row.

Purl one row.

Cast off.

With smaller needles and finer yarn, pick up 110 stitches along neckline. Knit for 1 inch. Cast off.

FINISHING

Weave those ends and TA-DA!

DIY knitting needles

D.I.Y Knitting Needles

Make some for yourself and some to share!


MATERIALS:
Dowels of various sizes (from hardware or craft store)
Saw
Sandpaper
Clay for ends

Cutting the Dowels

The dowels we found were 48 inches long, perfect to make two pair of needles each if cut into 12" lengths.
DIRECTIONS:
1) Cut dowels into lengths approproate for knitting with (we cut ours into 12" lengths.)

After cutting

2) Sharpen the ends with a pencil sharpener
3) Sand the dowel and its point until smooth and gently sloping
4) At this point, one may apply oil to the wood to smooth and polish it. I used spinning wheel oil. Rubbing the sowel and point with waxed paper will produce the same effect.

Sharpening

Needle Points

Clay blips on the ends
5) Roll oven-bake clay into balls for ends and bake to harden.
6) Let cool and glue the balls to the dowels
7) Let dry
8) Use!

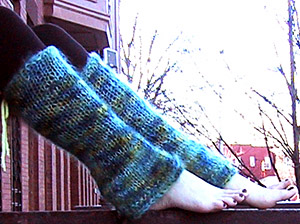
legwarmers

SIZE
adult S[M, L]
FINISHED MEASUREMENTS

Circumference: 10[12, 14] inches [stretchy]
Length: variable

MATERIALS

Cinnamon's Dye Pot [Brushed Mohair; ~250 yd per 4 oz skein] ; color: Enchanted Forest; 1 skein [all sizes]; or any glamorous yarn of the same weight. Use a finer yarn if a more open fabric is desired.

One skein sock yarn for I-cord
1 set US #15/10 mm straight needles
1 set US #11/8 mm straight needles
1 set US #2/2.75 mm double-point needles for I-cord drawstrings
darning needle


GAUGE

11 sts/12 rows = 4" in stockinette stitch

DIRECTIONS

Legwarmer [Make two]
Using #11 needles, CO 23[25, 27] sts.
Work 4 rows in St st.
Purl 5th row [RS] to make a purl ridge on right side of fabric.
Change to larger needles.
Work in St st for 7 rows, keeping knit side as RS.
Inc 1 st each side of 8th row -- 25[27, 29] sts total.
Continue straight for 7[9, 9] inches, ending with a WS row.
Next row [RS]: inc 7 sts evenly across. 32[34, 36] sts total.
Work 7 rows.
Next row [RS]: Inc 7 sts evenly across. 39[41, 43] stitches total.
Work straight to desired length ending with WS row.
Newt row [RS]: P across.
Work 4 rows in St st, keeping the knit side as the right side.

FINISHING

Steam pieces flat.
Using right side purl rows as a guide, turn and press both top and bottom 4 rows.
Sew seams together, being careful not to pull tightly so the seam will be invisible when finished.
Be sure to leave 2 inches open at top for I-cord casing.
Sew casing in place [sew as if hemming the top, but leave the edges open so that the I-cord can be inserted.]
Hem bottoms if desired.
Knit 2 feet of I-cord for each legwarmer.
Attach a big safety pin to one end of each I-cord length and thread into casing.
Tie into bows and get fabulous!